Thursday, December 5, 2013

Rustic Ciabatta Bread


Here is a recipe I am so excited to share. It is my last couple days living here in Grenada, and I had a few things in my pantry I wanted to use up before moving out. I had an itch to bake something, but had no milk or butter left...decided to use the rest of my flour, yeast, and a little oil to make one of my favorite breads of all time: ciabatta! Ciabatta is an Italian white bread with a soft, porous texture inside, and a nice crispy exterior. It is perfect for toasting and making bruschetta or crostini, as well as for pressing and making panini. It turned out to be so simple to make, and so delicious!

Ingredients:
2 cups of all-purpose flour
1 teaspoon active dry yeast
2/3 teaspoon salt
1/2 teaspoon sugar
1 1/8 cup lukewarm water
1 tablespoon olive oil

In a small cup, add the yeast and sugar to the lukewarm water, then stir. Let that sit aside for 5 minutes. In a mixing bowl, combine the flour and salt. Add the water mixture to the mixing bowl, half at a time, stirring with a wooden spoon. Stir mixture with the wooden spoon for at least 10 minutes. (It may look a bit dry at the beginning, but as you mix it will become a stickier dough...do not add more water than directed.)

Rub the sides of another bowl with the olive oil. Place the dough inside, cover the bowl with plastic wrap, and set it in a warm place to rise. Once it has doubled in size (took me 1 hour here in Grenada, may take longer in colder climates), lightly dust a work surface with flour. Stretch the dough out to a square. Fold the top and bottom sides to meet each other at the middle. Flip the dough over, and then fold the two other sides in (left and right sides) to meet each other at the middle. Place the dough back in the oiled bowl and cover, letting it rise until it has again doubled in size (took another hour for me).

Preheat the oven (425F or 450F depending on the size you will be making your bread...see below). Lightly brush some olive oil on a parchment-lined baking sheet and set it aside. Lightly flour your work surface again with some flour. Take the risen dough out and cut it in half (will make two long loaves...you may also cut it into quarters to make smaller loaves as I did for the bread in the picture). Stretch and shape each half (or quarter) into a rectangle on the baking sheet. Sprinkle the tops of the loaves with a bit of flour, and place them in the oven.

Bake for about 25-30 minutes at 450F (for smaller loaves), 35-40 minutes at 425F (for the larger loaves), or until the tops are nicely light golden brown. Once they are done, remove them from the baking sheet and allow to cool for 15-20 minutes. Buon appetito!

Here are two of the things I did with my freshly baked ciabatta:
Pressed Argentinian steak sandwich: grilled minute steak, chimichurri, caramelized onions, and fried sweet plantains (add any cheese you like)...assemble and cook in a panini press or on the stovetop in a pan with a weight over it.

Garlic bread: butter, minced garlic, and parsley, toasted under the broiler for 5 minutes.

Sunday, October 27, 2013

Arroz con Habichuelas (Rice with Beans)


Growing up in New York has its perks...being exposed to a wide variety of cuisines that are all around you is a foodie's dream come true. One that I miss while here in the Caribbean is Puerto Rican cuisine. Spanish food is similar to Guyanese in many ways, but the flavors can be completely different. These two things together, rice and beans, are found as side dishes in many of the Spanish restaurants in NYC. It is one of my favorite comfort foods that is easy on the budget and fast...add some fried ripe plantains (maduros)...perfect for a quick homemade exam week meal!

Arroz Blanco (White Rice)

Ingredients:
1 1/2 cups of medium-grained white rice
1 1/2 teaspoons of olive oil
3/4 teaspoon salt
2 cups water

Add the water to a small pot, and heat over high heat. When it starts boiling, add the oil, salt, and rice, and stir once. Boil, uncovered, until the water level almost reaches the level of the rice. Once the water has reached that level, turn the heat down to very low, stir the rice, and cover. Let the rice steam for 15 minutes. Then, remove the pot from the heat, stir the rice again, cover the pot, and let it rest in a warm place for another 10 minutes. After that time has passed, fluff with a fork and serve.

Habichuelas Guisadas (Stewed Beans)

Ingredients:
1 can of red kidney or pinto beans
4 oz tomato sauce (not paste!)
1 packet Goya Sazon seasoning
1/2 packet chicken or beef bouillon powder
1 1/2 tablespoons of Goya Sofrito seasoning (optional)
1 cup boiling water
salt to taste
1 teaspoon olive oil

In a small pot heat the oil over medium heat. Add the Sofrito, Sazon, and bouillon. Fry for 5-10 seconds and then add the tomato sauce. Cook the seasonings with the sauce for about a minute, and then add the cup of boiling water. Boil for about 5 minutes, and then add the can of beans with the water from the can. Cover and simmer for about 20 minutes, and then remove the cover and cook for another 5-6 minutes to thicken the sauce slightly. Once the beans are soft and the sauce has the consistency of a gravy, it's all done!

Saturday, October 5, 2013

Chinese Takeout Crab Sticks


This recipe is a copycat of one of my childhood takeout favorites. I just happened upon imitation crabmeat at the supermarket here that was in the form of sticks, so I decided to seek out panko breadcrumbs and eggs and I was ready to go. Granted, this is not a healthy recipe, but it is a comfort food that I was missing so far from home. The recipe is quick and easy, and doesn't require many ingredients!

Ingredients:
8 imitation crab sticks
1/2 cup of flour
2 eggs, cracked and whisked
1 cup of panko (Japanese) bread crumbs
Canola or vegetable oil for deep frying

Heat the oil in a frying pan over medium heat. Place each of the other ingredients into their own shallow dish and line the dishes up in the same order as they are listed.
Breading station (missing the flour!)
Dredge one crab stick at a time into the flour, then the egg, then the breadcrumbs to form a nice coating on each. Place each breaded crab stick into the oil and fry for about 3-4 minutes, turning to make sure each side fries golden brown. Remove from the oil and place on a paper towel-lined plate. Repeat with the other crab sticks, and serve with tartar or sweet chili sauce.

Note: The flour helps the egg stick to the crab stick, and the eggs help to hold onto the breadcrumbs. I made mine without the flour (didn't have any), so the breading was very thin. Next time I will try with the flour!

Seafood Fried Rice


This recipe was inspired by the seafood fried rice at Ruby Foo's in New York City. I was missing the American Chinese food over here in Grenada, so I decided to make my versions of a few of my favorite dishes. I kept it quite close to the original, except I used imitation crabmeat instead of real crabmeat like the restaurant uses. Finding good quality crab meat here is difficult, and I do like the flavor of the imitation crabmeat once in a while. 

Ingredients:
3 cups of cooked jasmine rice, at room temperature
Handful of asparagus stalks, sliced into thin rounds
1/2 pound of shrimp, any size you like, shelled, cleaned and deveined
3/4 cup of imitation crab meat, sliced (or 1/2 cup of real crab meat, drained)
3 eggs
1 garlic clove, minced
1/2 teaspoon of minced ginger
1/2 teaspoon of sesame oil
1/2 teaspoon of sugar
salt to taste
5 tablespoons of vegetable oil for frying

Heat the oil in a wok, and add the ginger and garlic. Fry over medium to high heat for a few seconds until aromatic, and then add the shrimp. When the shrimp are just beginning to turn pink, add the crabmeat. Stir fry until the shrimp are fully cooked (opaque and pink), and then add the asparagus. 
Seafood and asparagus being stir-fried
Whisk the eggs together in a bowl, and add the eggs to the wok. Stir fry with the seafood and asparagus until the eggs are fully cooked. Next, add the rice, sugar, and salt. Stir everything together, and fry for 2-3 minutes. I like to fry over high heat and let the rice sit at the bottom of the pan for a bit before stirring so that it browns a little, but that's optional. Add the sesame oil and fry for another minute or so. Remove  from the heat, and serve. 

Tips: It is very important to be careful not to overcook the rice that you will use to make the fried rice, or it will not fry very well. Just boil the rice until it is just cooked, but still firm. Also, allowing the rice to cool before frying it prevents it from cooking too much and becoming mushy. 

Friday, October 4, 2013

Delightfully Delectable Dulce de Leche


Dulce de leche is a milky caramel sauce that is popular in the Spanish countries of South America and also in Brazil (where it is known as doce de leite) . It has a rich and creamy consistency that is hard to resist, and goes well with many different desserts. The original method of making dulce de leche involves simmering milk and sugar together for a long period of time until the mixture thickens and darkens in color.

There are a few shortcut methods for making dulce de leche using sweetened condensed milk: some people boil, pressure, or slow cook the can and its contents, some cook the condensed milk over a double boiler on the stove-top, and some pour it into a pan and bake it in the oven. I have read about how easy the "whole-can" method is, but there are so many warnings about the can exploding that I was too afraid to try it. The oven method seemed easier than the stove-top method, as it requires less supervision (cooking time is pretty long for both). I tried the oven method, and it turned out fabulous!

Ingredients:
2 14-oz. cans of sweetened condensed milk
1/2 teaspoon of a fine-grain salt

Method:
Preheat the oven to 425F. Pour the cans of condensed milk into a shallow glass baking dish. Sprinkle the salt over the top and whisk to mix. Cover the glass dish tightly with foil. Place the glass dish in a larger baking/roasting pan. Pour water into the larger pan until it reaches a level of about halfway up the sides of the glass dish. Place it in the oven, and bake for 2 - 2 1/2 hours, checking every half hour or so to add water if it goes below the original level. Once the condensed milk has turned a deep golden brown, remove the pan from the oven. When you first take it out, it will have the texture of a custard, so whisk the dulce de leche until smooth and allow it to cool completely. It will thicken slightly upon cooling. Store in a jar and refrigerate for up to a week.

Out of the oven
After whisking smooth

Don't know what to use dulce de leche for?
Try it as a filling for cakes (recipe coming!) or cookies, a topping for ice cream or apple pie, swirled in cheesecakes, as a dip for apples, and so much more. Try it, and be creative!


Dulce de Leche Cake
Dulce de Leche-filled Cupcakes

Wednesday, September 18, 2013

Broiled Lobster Tails


I finally discovered the world of fresh lobster tails on the island during my last semester in Grenada. There are local fishermen everywhere in town, and lobster is cheap and fresh when it's in season. At just US $3 a pound, it is easy to have a delicious lobster dinner on any night of the week! There are a few ways to prepare lobster: steaming, poaching in butter, grilling, or broiling. My favorite is broiled lobster, as it seems to concentrate all the wonderful flavor.

Ingredients:
2 lobster tails (defrost if frozen)
1/2 cup of butter
1/2 teaspoon of paprika
1/2 teaspoon of garlic powder (or 1 teaspoon fresh minced garlic)
2 teaspoons of lemon or lime juice
salt and white pepper to taste
1 teaspoon Old Bay Seasoning (optional)

Preheat the broiler. Wash the lobster tails with some lemon juice, and place them on a cutting board. Using strong kitchen shears, cut a line along the top shell from the front towards the end of the tail stopping just before the end.
Fresh lobster tail
Cut and open lobster tails
Pull the shell apart to open it up. Rinse the tails again to remove any pieces of shell and any dirt from inside. Pat the tails dry with a paper towel. If you like, you may pull the meat up and out of the shell (with the end still attached inside), and rest it on top of the shell. This is called piggybacking. My broiler was too small so I had to leave the meat inside of the shell. Place the prepared lobsters on a baking pan. Melt the butter and add the paprika, garlic powder, salt, and pepper (and Old Bay, if desired). Pour the seasoning butter over the tails and place them in the broiler. Broil the lobster tails (about 15 minutes per pound of tail) about 4-6 inches away from the flame. 
My lobsters sitting in the broiler
Broil them until the meat turns opaque and the shells turn red. Remove from the shell and serve with clarified butter. Enjoy!
I piggybacked mine after cooking them, here is one with some wild rice pilaf I made to go with it.

Sunday, September 8, 2013

Simple Peanut Butter Cookies


 Peanut butter cookies are one of my favorite types of cookies, and this recipe makes it so easy to have in a short amount of time! There are only 3 ingredients (which are usually already in my kitchen), and they bake up in almost no time at all. Soft, chewy, and delicious, these cookies are a must try!

Ingredients:
1 cup of peanut butter
5 oz (a little over a 1/2 cup) of lightly packed light brown sugar
1 egg

Preheat the oven to 350F. In a mixing bowl, combine the peanut butter and sugar and mix. Add the egg and mix until everything is well combined.
Three ingredients
Mixing the cookie dough
Cover baking pans with cookie sheets or wax paper (do not grease them, the peanut butter has enough oil!) Form round balls with the cookie dough (about 1 inch in diameter), and place them on the prepared cookie sheets. Take a fork and make crosshatch marks while flattening each of the cookies.
Cookies ready for the oven
Place the cookies in the oven and bake for 10-12 minutes, or until the sides start to brown a little. Take them out and allow them to cool on the baking sheets for 15-20 minutes before removing them. Enjoy with a cup of milk or tea!

Note: Depending on the brand of peanut butter you use, the cookie dough may come out too greasy. Just add a bit of flour until it reaches cookie dough consistency and holds together. Mine did not need flour but the dough wasn't as firm as I would have liked, so I refrigerated the dough for about 10 minutes before forming the cookies. 

Saturday, August 31, 2013

Quick and Easy Chicken Dinner


Sometimes I crave something simple; a light, healthy, meal with fresh ingredients. One without a heavy sauce or spices to mask the natural flavors of the main ingredients of the meal. This chicken dinner just that, and is also easy and quick to make...perfect for a busy weeknight! I usually use lemons when baking chicken, but they are difficult to find here in Grenada. I settled on some unripe oranges, as the oranges here never become as sweet as the ones in the U.S. and usually taste more like lemons anyway.

Ingredients:
2 chicken leg-quarters
2 whole lemons 
2 garlic cloves, minced
1/2 teaspoon of fresh thyme, chopped
1/4 teaspoon of dry oregano (you may use fresh if you have)
2 teaspoons of olive oil
salt and fresh cracked black pepper, to taste

5 small potatoes, cut into quarters
4 carrots, diced into 1-inch pieces
2 teaspoons of olive oil
1/2 teaspoon of parsley
salt and fresh cracked black pepper, to taste

Preheat the oven to 350F. Slice the two ends of the lemons off and discard. Then slice two thin round slices of the lemons, and the rest into thicker (3/4-inch) slices. Place the thick slices of lemon on the bottom of a baking dish. 
2 thin slices and a few thick slices
Placed in the baking dish
Wash the chicken, then trim some of the fat and extra skin. Slide your fingers under the skin to lift it off and create a pocket. Mix together the garlic, thyme, and a little salt, and rub the chicken with the mixture under the skin. Next, place one thin slice of lemon under the skin of each of the pieces of chicken. Sprinkle some salt and black pepper on both sides of the chicken pieces. Place the chicken on top of the lemon slices in the pan, and then drizzle the olive oil over the top of the chicken.
Garlic and thyme
Minced garlic with thyme, oregano and salt
Place the chicken on top of the lemon slices in the pan, and then drizzle the olive oil over the top of the chicken.
Chicken ready for the oven
In another baking dish, add the potatoes and carrots, along with the oil, parsley, salt, and black pepper. Mix them together and then place in the oven. Bake both the chicken and the veggies for about 1 hour-1 hour and 20 minutes, or until the internal temperature of the chicken read with a kitchen thermometer reads 165F. The veggies should be almost fork-tender and golden brown along the edges. Enjoy!

French Toast with Caramelized Bananas and Walnuts


Since I've arrived back on the island from summer break, I've had a craving for french toast. I decided that I wouldn't make it until I had the time to enjoy making and eating it, and until I had all the right ingredients. Finding all the right ingredients is tough here, but it was a success! I found a lovely little bakery in the city of St. George's called The Merry Baker. It is owned and run by a friendly South African couple who agreed to bake me a fresh loaf of brioche (even though it wasn't one of their regular items). Once I had that, I had to decide what I would add to my french toast to take it to another level. I could not use that wonderful fresh bread on just a simple french toast. My first idea was to make an amaretto-flavored french toast, but I could not find a nice small bottle of amaretto here. The next idea was to top it with fresh berries, but as strawberries, blueberries, and raspberries are not grown locally, they are expensive and hard to find. I decided on the caramelized bananas since they can be found grown locally everywhere on the island. It was my first time making a caramel sauce, but it turned out to be easier than I expected and so delicious! 

Ingredients:
French Toast:
4 thick slices of brioche bread
2 eggs
1/2 cup of milk
1 tablespoon of sugar
1/2 teaspoon of almond essence (this can be substituted with an extra 1/4 tsp of vanilla)
1/4 teaspoon of vanilla extract
3-4 tablespoons of butter

Caramelized Banana and Walnut Topping:
2 ripe bananas, sliced thick at an angle
1/4 cup of walnuts
2 tablespoons of butter
4 tablespoons of light brown sugar

To Make the French Toast:
Whisk together the eggs, milk, sugar, almond essence, and vanilla. Once they are well combined, pour the batter in a shallow dish large enough for dipping the bread slices. Place a slice of bread into the batter and let it soak for at least 30 seconds. Flip the bread over to let the other side soak. Heat 1/2 tablespoon of butter in a medium-sized frying pan over medium heat. Once it has melted, add the soaked slice of bread to the pan. Fry until that side is golden brown and flip, adding more butter if necessary. When both sides are nicely browned, the french toast is finished! Repeat with the remaining slices. You may serve this as is, or topped with syrup, fresh fruit, or powdered sugar.
*Note: French toast is best made with day old bread, so try to buy your bread a day ahead and it will be perfect when you are ready for it!

To Make the Caramelized Banana and Walnut Topping:
Melt the butter over medium heat in a small frying pan, and add the sliced bananas to the pan. Sprinkle in the sugar and flip the bananas, being careful not to cook them too much. Once the caramel sauce starts to bubble, add the walnuts and cook for a few more seconds. Remove from the heat and immediately spoon the topping over your french toast. 
*Be careful not to cook the caramel sauce too long or the sugar may re-crystallize and turn your sauce into candy.


 Beautiful brioche loaf
Nice thick slices

Monday, July 29, 2013

Soft and Fluffy Dinner Rolls


There's something so comforting about freshly baked, soft and fluffy bread hot out of the oven. This recipe is adapted from a copycat recipe for Texas Roadhouse Rolls. They are less dense and more soft than the actual Texas Roadhouse version, so they're even more delicious! The down side for me (being as impatient as I am) is waiting for the bread to rise every time...but once they're in the oven, they're ready in just a few minutes!

Ingredients:
2 teaspoons of active dry yeast
1 teaspoon of sugar
1/4 cup of warm water
1 cup of milk
1 1/2 tablespoons of butter, plus more for brushing
1/4 cup of sugar
4 cups of flour
1 egg
1 teaspoon of salt

Stir the yeast and 1 teaspoon of sugar together in the warm water. Set aside to bloom until it has doubled in volume. Scald the milk in a small saucepan (heat slowly until small bubbles just begin to show on the side...do not boil!), remove from the heat and add the 1 1/2 tablespoons of butter. Stir and let it cool.

Once the milk is lukewarm, add it to the yeast mixture, and stir in the 1/4 cup of sugar and 2 cups (about half) of the flour. Mix well (it will look like a batter, not a dough), and let it sit for 10 minutes.

After 10 minutes, add the egg, salt, and enough flour to form a soft dough (you may not end up using the full 4 cups). Let the dough rest for 10 minutes.

After this second 10 minute rest, turn the dough out onto a floured surface, and knead until smooth, about 6-8 minutes. Grease a large bowl and add the kneaded dough to it, turning it over to let the top also be greased. Cover tightly with plastic wrap and set the bowl in a warm place to rise for 1-1 1/2 hours, or until doubled in size.

Once the dough has doubled in size, punch it down and place it back onto a floured surface. Roll it out to about 1/2 inch thick. Fold it in half to make it 1 inch thick, and roll over it lightly to make the two halves stick together. Let this rest for 10 minutes.

After those 10 minutes have passed, cut the dough into 2-inch squares and place on a greased cookie sheet. Cover the squares with a damp cloth and set in a warm place to rise for another hour.

Once they have doubled in size, preheat the oven to 350F. Place the rolls into the oven and bake for 10-15 minutes, or until they are light golden brown on top. Once they are removed from the oven, you may brush the tops with some melted butter. Enjoy while warm!

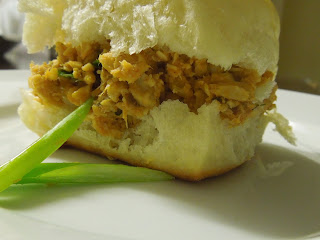
One way I enjoyed these rolls was with some delicious salmon! Click here for that recipe!

Sauteed Salmon


This recipe is a quick and easy way to turn leftover or canned salmon into something special.  It is a basic recipe with things that I always have in my kitchen, and it goes well in a sandwich on my soft and fluffy dinner rolls!

Ingredients:
1 6oz. can of boneless, skinless salmon (or the same amount of cooked salmon)
1/4 yellow onion, chopped
1 teaspoon of tomato paste
1 scallion (green onion) stalk, chopped
1 wiri wiri pepper (or any seasoning pepper), seeds removed and finely chopped, optional
1/4 teaspoon of garlic powder
1 tablespoon of olive oil
salt to taste

Heat the oil in a small frying pan, and add the chopped onion and tomato paste. Let that fry for about 2 minutes, then add the pepper and the salmon. Use the back of your cooking utensil to break up the salmon and allow it to mix with the tomato paste and onions. Add the garlic powder, salt, and chopped scallion. Fry for about 5-6 minutes, or until the salmon is heated through and has picked up all of the wonderful flavors of the seasonings. Enjoy with bread or Guyanese bakes.


Baked Crab Cakes


I have decided that my favorite food in the entire world is crab cakes. I love crab, and having just the meat in a delicately fried cake makes what would be a meal of cracking and digging up shells a whole different experience. In this recipe, I tried a healthier way of cooking them...instead of frying the cakes, I baked them! The secret to this recipe is the quality of the crab meat. You can find canned, frozen, or refrigerated crab meat in the supermarket. My favorite is Phillip's brand lump crab meat, which is usually found in plastic containers in the refrigerated section. It is pricey, but for this one in a while treat, it is so worth it!

Ingredients:
1 8 oz package of lump crab meat
1 egg
2 tablespoons of mayonnaise
1/2 cup of seasoned breadcrumbs (you may use panko breadcrumbs instead)
1/2 teaspoon of old bay seasoning
1 teaspoon of lemon juice
1/4 of a red bell pepper, chopped finely
1/2 celery stalk, chopped finely
1 tablespoon of olive oil

Preheat the oven to 400F. In a medium sized mixing bowl, combine the egg, mayonnaise, 1/4 cup of the breadcrumbs, the old bay seasoning, and the lemon juice. Mix well, and then add the bell pepper and celery. Once combined, gently fold in the crab meat. 
Seasoning before the crab and veggies are added
Crab meat, bell peppers, and celery
Pour the rest of the breadcrumbs in a small plate. Take handfuls of the crab mixture, form balls, and then press gently onto the breadcrumbs on the plate. Turn the cake over to flatten and coat the other side. Continue until all of the cakes are formed. (This recipe makes about 8 small cakes, but can easily be doubled to make more.) Coat the bottom of a baking pan with the olive oil, and place the cakes on the pan. 

Place in the oven and bake for about 10 minutes, or until the bottoms of the cakes are browned and crispy. Gently flip the cakes over and bake for another 3-5 minutes or until they are crispy on the other side. Enjoy!

(For anyone who would like to make crab cakes the traditional way: Make the cakes as directed above, then add 3-4 tablespoons of oil to a frying pan and fry the cakes over medium heat on each side until golden brown and crispy.)

Saturday, April 27, 2013

Guyanese-Style Zucchini with Shrimps


This recipe is a traditional vegetable dish from Guyana. Many of the vegetables can be cooked in the same way, like spinach, eggplant, bitter melon (karela), and string beans, with addition of any meat as well potatoes. This is just one of the Guyanese recipes for zucchini; it can also be curried or deep-fried in a split pea batter. The shrimp I used were the tiny white belly shrimp from Guyana, which are eaten with the shell as they are thin and soft. However, any kind of shrimp or meat can be substituted in this recipe, or it can be made without or with tofu as a vegetarian dish.

Ingredients:
     3 zucchinis, peeled, seeds removed, and cubed
     1/2 cup of white belly shrimp
     1/2 white onion, finely chopped
     3 cloves of garlic, finely chopped
     1/2 tablespoon of tomato paste
     2 fresh wiri wiri peppers, seeds removed and chopped (optional)
     1 1/2 tablespoons of olive oil
     Salt to taste

Heat the olive oil in a pot over medium heat. Add the onion, garlic, and pepper and fry for about a minute, and then add the shrimp. Stir fry for a few minutes until cooked, and then add the tomato paste. Add the cubed zucchini, stir and cover. The zucchini should slowly begin to release water and steam. Stir once in a while and add the salt. Cook, covered, for about 20-25 minutes, or until the zucchini is cooked through. Serve with rice or roti, and enjoy!
Peeling and cubing the zucchini
Frying the shrimp with onion and garlic

After adding the zucchini

Thursday, April 25, 2013

Mini Fruit Pies


This idea came to me as I was brainstorming for baked goods to bring to a pathology lab meeting. There had already been brownies and cookies brought at previous meetings, so I thought a pie would be a good change...only thing was that it would be difficult to slice and serve a pie during lab. Instead, I decided to make a variety of mini pies so that everyone would be able to have one of their own without all the mess. I made caramel apple, pineapple, and cherry pies, so I've included the instructions for making each of those fillings as well.

Ingredients:
     2 batches of pie crust dough (or 2 store-bought pie crust dough sets)
     Fruit filling (see below)
     1 egg
     1 tablespoon of milk
     2 tablespoons of white sugar for sprinkling
     Caramel sauce (I used store-bought), optional

Preheat the oven to 350F. Roll out each piece of the pie dough to about 1/8 inch on a counter top (I use a sheet of wax paper for easy cleanup and a non-stick surface). Drop tablespoonfuls of fruit filling around one of the dough sets and spread around with the back of the spoon. Place the rolled out top dough over the bottom one with the filling. Use a cookie cutter (I used the top of a mug) to cut out circles around each set of filling. Cut slits on the top of each circle to allow steam to release from the pies as they bake.

Bring the scraps of dough together into a ball and roll out to about 1/8 of an inch again. Continue to make the pies as directed above until there is not enough dough left to make any more. In a small bowl beat the egg and the milk together. Place the pies on a cookie sheet and brush the top of each one with the egg wash. Sprinkle each with sugar and bake for 15-20 minutes or until the tops of the pies are golden brown. Cool before removing from the cookie sheet.

Alternatively, cut one set of the rolled out dough into thin strips. Weave into a lattice and place over the bottom dough with the filling. Continue by cutting as directed above, brushing with egg wash, and sprinkling with sugar.
Strips to weave into a lattice
Mini lattice pies
FRUIT FILLINGS:
Apple filling:
     2 Granny Smith apples, peeled, cored, and chopped into small chunks
     2 tablespoons of light brown sugar
     1 tablespoon of cornstarch
     1/2 teaspoon of lemon juice
     pinch of cinnamon
     1/4 cup of water
Add everything into a small saucepan over medium heat. Stir and cook until the apples are tender and the filling has thickened, about 5-6 minutes. Cool before filling the pies. (For the apple pies, I add a little bit of caramel sauce onto the dough first and then the apple filling on top of it.)
Pineapple filling:
     1 can of crushed pineapple with juice
     1/2 cup of white sugar
     3 teaspoons of cornstarch
     1 teaspoon of lemon juice
Add everything to a small saucepan over medium heat. Bring to a boil and cook for about a minute, until thickened. Cool before filling the pies.
Cherry filling:
     1 cup of tart red cherries, pitted and chopped
     1/4 cup of sugar
     1 tablespoon of cornstarch
Add the cherries to a small saucepan over medium heat. Bring to a simmer. Once the cherries have released some of their juices, add the sugar and cornstarch. Continue to cook until thickened, about 2 minutes. Cool before filling the pies.
Note: There are instructions for making pie dough from scratch in my Dutch Apple Pie recipe post. Enjoy!